Thursday, February 27, 2014

Valentines Special (2014)

Val's Version
(Denver, CO)

Love was definitely in the air at our house this year! So many people to share it with, it was hard not to. I had some small decorations around the house which works well for me since pink and purple are my favorite colors. Unless it has to do with my attire and that typically consists of black, browns and grey ;) Totally clashes with expressing adoration for the ones you love, right?

Started off the day with a lovely breakfast for my oldest before she went off to school.


Getting the eggs into the shape of a heart was harder than the actual recipes for the treats below.


Hey - how'd those get in there ;) Sweetest husband, EVER!!!

I put together some small little sweet treats while Dad conquered the grill. We call him "Marty Flay" when he actually takes the time to cook. He tends to tear it up just like the well known household name, Mr. Bobby Flay. So, while he was preparing steaks and lobster tail, I put on a show of Valentine Brownies and Cupid's Float! Nothing too fancy, but had great kid appeal!


Jen wasn't thrilled with how this recipe looked, but agreed to do it since it was "for the kids." I LOVE strawberry, so was all about at least trying it. I'm glad we did :)


As you can see, I added some white chocolate chips in case it wasn't quite 
strong enough to give us all cavities. 


Mixed it all up in one of my handy sidekick; my KitchenAid Mixer!


Baked at 350 for about 30 minutes (longer than recipe stated since I'm a mile above sea level).


Sprinkled some powdered sugar over the brownie squares and serve them warm!


Cupid's Float was very simple … Cherry 7UP, scoop of Vanilla Ice Cream and Whipped Cream!!! I completely forgot the "cherry on top," so feel free to add one … or two!

Valentine Brownies
Prep Time: 5 minutes
Cook Time: 14 minutes
Total Time: 20 minutes 

Ingredients:

Strawberry Cake Mix
2 Eggs
1/3 C Oil
Powder Sugar
1 1/2 T Milk/Water

Directions:

Mix the cake mix, eggs and oil in the mixer. Pour into 9x13 greased baking pan. Bake at 350 degrees for 14 minutes. For glaze, mix 1 c. Powdered sugar with 1 1/2 tablespoons milk or water. Pour over warm brownies.

Jen's Version
(Roswell, GA)

Meanwhile in Georgia...


So the week of Valentine's Day, Georgia had it's SECOND winter storm of the season. The girls and I did not get to prepare for any yummy treats due to the picture referenced above. Instead, we all huddled at home and enjoyed family time. Without steak. Because steaks were sold out. And no creme brulee. Because creme brulee was sold out...okay, because I didn't make it. 

We huddled at home with beautiful flowers and matching socks.


Loaded Potato and Buffalo Chicken Casserole

*** February Guest Chef - Cali Zequeira ***
(Val's "almost" 12 year old daughter)

Cali's Version 
(Denver, CO)

OMG! I got really excited when my mom told
me that I was going to be the guest chef!


With only the little bit of red pepper
that we used, it made me cough.


Holy cow, lots of darn hot sauce.


I swear I almost cut myself.


MMM MMM MMM, Its good mood food!!
Stir the potatoes about every 10-15 minutes.


"Add and Tir." Lucas repeated literally everything Mom said.
You've got to spoon it carefully before it splats. (The Chicken)


Again, stir the chicken frequently.


Top some bacon on and "BOOM - SIT DOWN SON"
 to eat some dinner!

\

but first you gots to put it in the oven to let the
cheese melt. AND ENJOY! :)


Val's Notes: 

We adjusted this recipe in a few ways. 1) we didn't have all the initial ingredients and 2) we love CREAM CHEESE! We cooked the chicken and mixed it with my infamous Buffalo Chicken Dip concoction (this recipe will be posted during our March Madness Special, so stay tuned). Aaaaand … we have yet to use cream cheese on our Blog and it's pretty much a staple ingredient in our house. Some may consider us fattys. I prefer cheese heads (and no - we're not from Wisconsin).

So, if you want to add cream cheese, get a softened bar of regular cream cheese and stir it in with about 1/2 cup to 1 cup of ranch dressing. We also threw in some extra hot sauce! Tossed that all together before adding in with the potatoes.

Loaded Potato and Buffalo Chicken Casserole
Prep Time: 15 minutes
Cook Time: 1 hr and 10 minutes
Total Time: about an hour and a half

Ingredients:

2 lbs boneless, skinless chicken breasts, cubed into 1/2" pieces (we preferred cooked)
8-10 medium potatoes, cubed into 1/2" pieces (Cali chose 8 red potatoes)
1/3 c olive oil
1 1/2 tsp salt
1 T ground black pepper (Cali substituted 1/2 tsp red pepper)
1 T paprika
2 T garlic powder
6 T hot sauce (Cali used Franks)
2 c cheese blend of choice
1 c crumbled bacon
1 c diced green onions (Cali omitted the onions)
Ranch dressing

Directions:

Preheat oven to 500 degrees F. In a large bowl, mix together the olive oil, salt, pepper, paprika, garlic powder & hot sauce.  Add the cubed potatoes and stir to coat.  Carefully scoop the potatoes into a cooking spray coated 9 x 13 inch baking dish, leaving behind as much of the olive oil/hot sauce mix as possible.  Bake the potatoes for 45-50 minutes, stirring every 10-15 minutes, until cooked through and crispy & browned on the outside.  While the potatoes are cooking, add the cubed chicken to the bowl with the leftover olive oil/hot sauce mix and stir to coat.  Once the potatoes are fully cooked, remove from the oven and lower the oven temperature to 400 degrees F.  Top the cooked potatoes with the raw marinated chicken.  In a bowl mix together the cheese, bacon & green onion and top the raw chicken with the cheese mix.  Return the casserole to the oven and bake for 15 minutes or until the chicken is cooked through and the topping is bubbly delicious.  Serve with extra hot sauce and/or ranch dressing.

Adapted recipe from Cook Lisa Cook!

Jen's Version 
(Acworth, GA)


Now how do I follow that? I am so impressed by my 11 year old niece. I don't remember 11 so well, intentionally blocking out that awkward stage, but I KNOW I wasn't cooking and blogging. They grow up so fast...


So I normally don't photog my grocery visit, but I ran across an interesting item. If you know me, you know I have this paranoia towards expired foods, expiring foods, sell by date has passed foods, etc. I have a theory that Kroger only "Manager Special's" foods that have expired or are about to expire - so I don't usually buy them because of my paranoia (...I'm a snob). So this grocery trip, I run across speckled butter beans. They don't expire until 3/8 (I'm hoping that's what that number is for) and they are fresh. My family likes beans. Oh, and not to mention, they were ONLY $0.99! 

But...what are speckled butter beans? 

Via the internet: The speckled butter bean is one of 100 named varieties of the lima bean (Phaseolus lunatus), native to South and Central America. “Butter bean” is a Southern term for what are called lima beans in other regions, and they are a familiar part of Southern cuisine.

Okay - so I bought them. And YOU WILL see them in my recipe next week. And YOU WILL like them. Because I bought a Manger's Special and I WILL cook them. And WE WILL LOVE SPECKLED BUTTER BEANS!


Hey Cali! I did cut myself! Still wearing a big girl band-aid cause I'm so tough, too. 


I didn't get any images of me mixing up the sauce, thanks to my accident, but Cali was right - that sauce made me cough. I thought adding TABLEspoons of paprika and pepper would be too much. I even said it out loud, "this is too much". But it wasn't! It was a perfect sauce. The olive oil and the hot sauce with the seasonings coated the potatoes perfectly and when they were done - they were perfect! Crispy, soft, full of flavor - perfect!


See!

Only thing I would change is ME having to stir them every ten minutes. I talked to Val the next day as she bragged on her child cooking this meal, and she mentioned that Cali was busy the whole time she cooked. Cleaning, stirring, chopping...
Ugh. So. was. I. 
There will be a crock pot meal next week...

While my pototoes cooked - I fried up some bacon. 


The only sight better than that is this...


Cheese and bacon. This is the topping. I skipped scallions because I read this story one time about a guy dying from Salmonella (I think) at a restaurant after eating scallions. I would NEVER admit that to my husband because I would never hear the end of it. 

I also pre-cooked the chicken cubes that soaked in the extra sauce and added hot turkey sausage. I topped the potatoes with the meat and cheese and baked to a crispy perfection. 


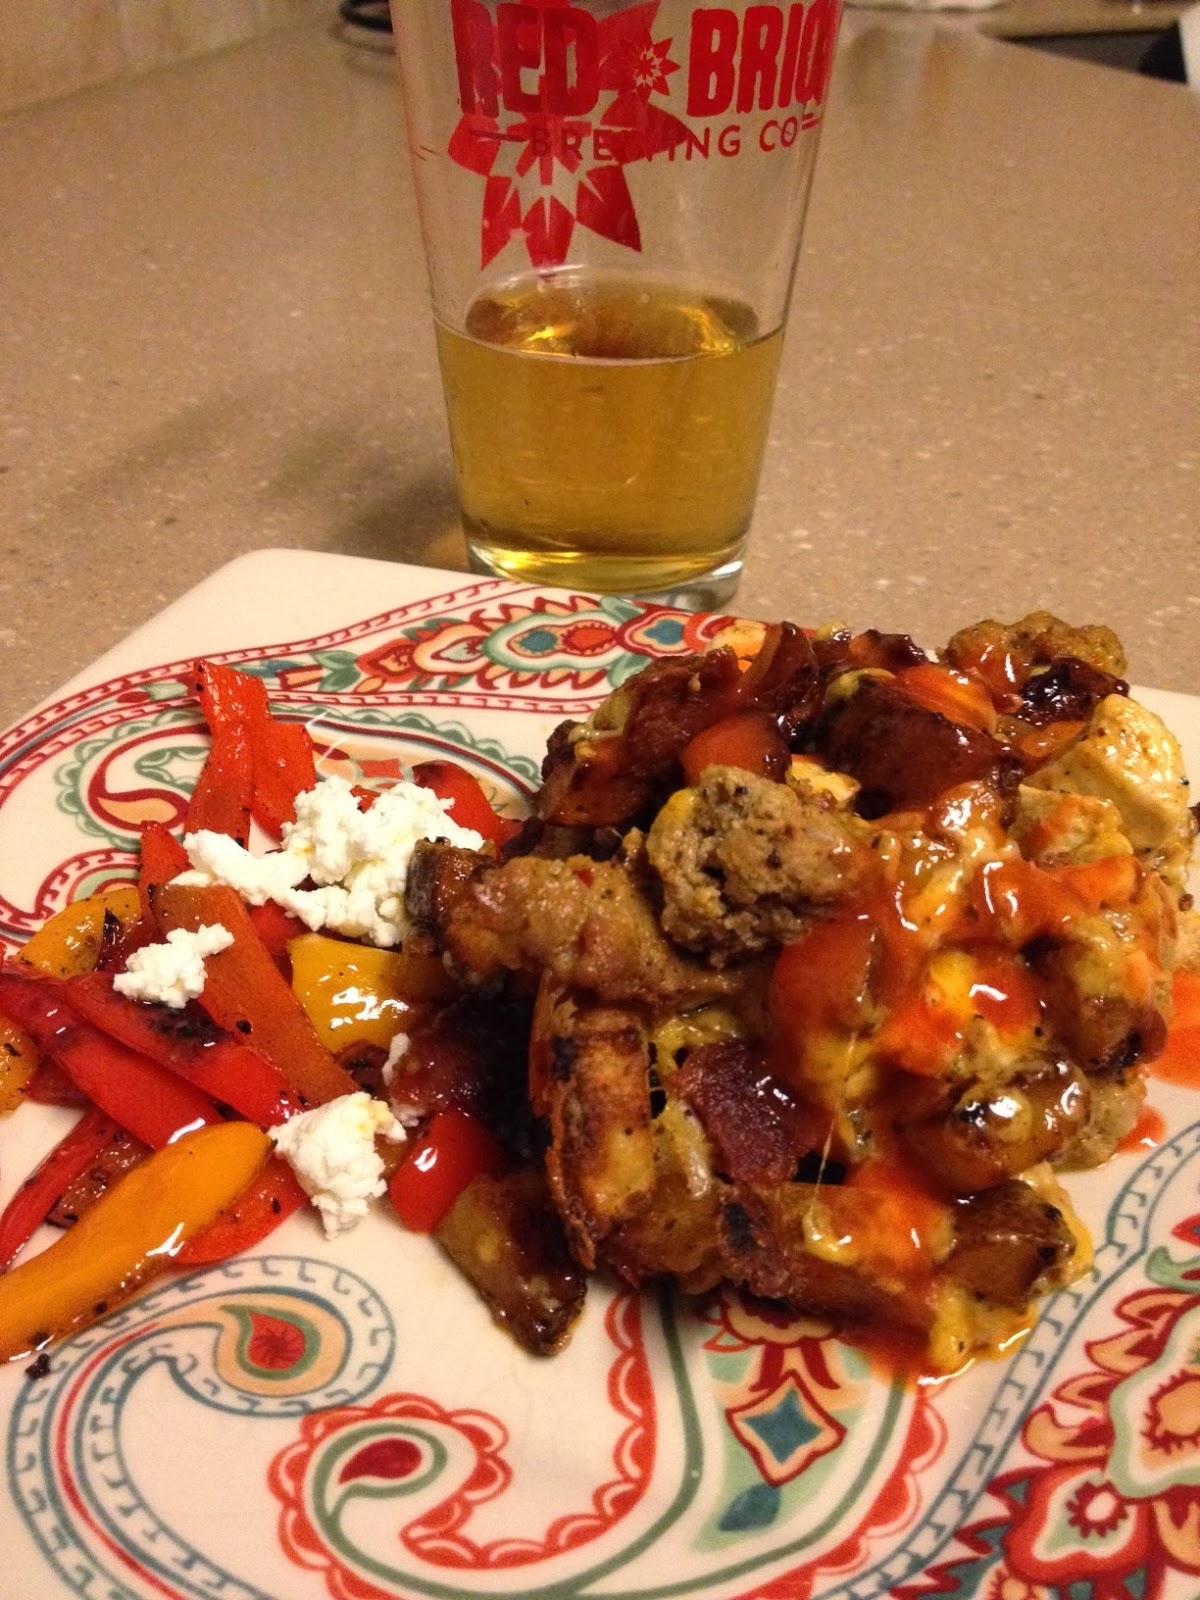
Loaded Potato and Buffalo Chicken Casserole. 


Paired it with sauteed peppers and goat cheese, a little more hot sauce and a beer. The perfect meal. This recipe is going into my "usual's". 


Loaded Potato and Buffalo Chicken Casserole
Prep Time: 15 minutes
Cook Time: 1 hr and 10 minutes
Total Time: about an hour and a half

Ingredients:

1.5 lbs boneless, skinless chicken breasts, cubed into 1/2" pieces (cooked)
1 cup of hot turkey sausage (cooked)
5 medium potatoes, cubed into 1/2" pieces 
1/3 c olive oil
1 1/2 tsp salt
1 T ground black pepper 
1 T paprika
2 T garlic powder
6 T hot sauce (Franks)
2 c mild cheder
1 c crumbled turkey bacon

Directions:

Preheat oven to 500 degrees F. In a large bowl, mix together the olive oil, salt, pepper, paprika, garlic powder & hot sauce. Add the cubed potatoes and stir to coat. Carefully scoop the potatoes into a cooking spray coated 9 x 13 inch baking dish, leaving behind as much of the olive oil/hot sauce mix as possible.  Bake the potatoes for 45-50 minutes, stirring every 10-15 minutes, until cooked through and browned on the outside. While the potatoes are cooking, add the cubed chicken and turkey sausage to the bowl with the leftover olive oil/hot sauce mix and stir to coat. Saute the meat in a cast iron skillet until almost fully cooked. Once the potatoes are fully cooked, remove from the oven and lower the oven temperature to 400 degrees F. Top the cooked potatoes with the meats. In a bowl mix together the cheese and bacon and spread across the top of the dish. Return the casserole to the oven and bake for 15 minutes or until the chicken is cooked through and the topping is bubbly delicious.  Serve with extra hot sauce.

Adapted recipe from Cook Lisa Cook!

Monday, February 24, 2014

Roasted Chicken with a Brown Sugar Glaze

Val's Version
(Denver, CO)

I was googling images to make sure I placed my chicken little in the roasting pan correctly, 
and came across this … 


Di-sturb-ing. This is not my hand nor would I EVER do something like this.

Ok - back to reality … and normalcy. Sorta.


When I was reading the recipe and saw that butter and brown sugar were THE flavor, it made me think of dessert, so I got really excited. 


Then I saw the naked chicken. 
Mix and prepare yourself for the grotesque fondling of the helpless little bird. 
(I am not a fan of this step and will consider having my 11 year old do it next time).


Get the goodness spread all over - in the crevices and all - and put the bird
into the oven for an hour, plus.


I checked at about the hour mark and knew I only had a few more minutes to go. That and my smoke detector kept going off because of the juices burning in the roasting pan. 


This came out very juicy and tender. We also had some corn on the cob (I cut mine off to share with my toddler), green beans and salad. Delish!


Quote of the night from my daughter, Cali: 

"I would say I'm impressed, but I'm not impressed because you're a good cook and I get meals like this every night. But, it's really good!"

Oh - and don't ever forget a sweet treat … gotta love Orange "SHERBERT" Mini Cupcakes :)

(I cheated - thanks, Duncan Hines)

Jen's Version 
(Acworth, GA)

Ugh, here we are again with having to handle raw meat...


Cooking whole chickens is the only time I consider being a vegetarian. Until I eat it...


And Val thought the picture she found was weird! I lathered this baby up with butter and brown sugar. The recipe we found suggested placing a beer can inside the chicken with some beer left in it. I thought what the heck, why not. Very, VERY weird concept.


Might be one of the prettiest chickens I've ever roasted.


It took about 1 hr 20 mins in a 425 degree oven. Completely worth all the effort of waiting.

I paired the chicken with cous cous. I wanted to try something new as a side, and Chris suggested the cous cous. Didn't know he was a fan of the middle eastern grain. I cooked it as the package suggested and added fresh lemon and parsley.


It wasn't MY favorite all by itself so I made a little cous cous salad...


I would say the family enjoyed this dinner.


Brown Sugar Butter Roasted Chicken
Prep Time: 20 minutes
Cook Time: 1 hr and 20 minutes (cool for 15-20 minutes)
Total Time: about 2 hours

Ingredients: 

1 roasting chicken (any size will do - adjust butter to size of chicken)
1/2 cup butter, softened
1/4 cup brown sugar
1 tsp course sea salt
1 tsp black pepper

Directions: 

Preheat oven to 425 degrees. Clean and prepare your chicken for roasting; wash, dry and remove giblets. Combine softened butter and brown sugar in a bowl until creamy. Use your hands and rub the butter mixture all over the chicken. Sprinkle the entire chicken with salt and pepper. Set the chicken in a roasting pan, breast side up, OR you can roast it over a can of beer if you do not have a roasting pan - set the beer can with a few sips of beer left into the pan and shove it up into the chicken. Feel free to add sliced onions around the chicken, but other veggies won't hold up. The butter and sugar really caramelize the chicken. Roast for about an hour and 20 minutes. Slice the leg and if juices run clear … winner winner, chicken dinner! Wait about 15 to 20 minutes before cutting and serving with some tasty veggies. 

Thanks, Jessica, for this sweet eat!

Coconut Shrimp

Jen's Version 
(Acworth, GA)

I am a fan of seafood. I get upset when I'm at the beach and people don't want to eat fresh seafood. I'm upset that they are denying themselves of the goodness. When Chris and I first started dating, we would go to Hemingway's on the Square. They have an outside patio with live music and the best coconut shrimp. I don't think I had ever tried coconut shrimp before there, so it became this great memory for me of dating my now husband. Now that we have kids and less time to date, I have learned to make coconut shrimp at home. It's not entirely the same, but still very yummy!

What you need:
1 cup all-purpose flour
1/2 teaspoon paprika
1/2 teaspoon black pepper
1/4 teaspoon cayenne pepper
1/4 teaspoon salt
2 large eggs
1 cup sweetened shredded coconut
1 cup panko bread crumbs
1 lb extra-large shrimp (21 to 25 count), peeled and deveined
vegetable oil for frying

Having extra large shrimp is VERY important. If you're gonna do shrimp, do big shrimp. When you cook and fry em, they will shrink. So you need big, juicy, awesome shrimp. Mix your seasonings in the flour in one bowl and your bread crumbs with the coconut in another. Also, lightly beat your eggs in a third bowl. 


The process of "battering" something has become a staple in my cooking. Now when I do anything battered, I use these steps. 

1. Dredge the shrimp in the flour and shake off excess
2. Dip in the egg
3. Coat with the bread crumbs
Dredge. What a weird word...


I leave the tails on so I can do this process easier. Tomato, tomatoe.


Now you fry em up in the heated vegetable oil. You will watch for when they get brown to know to flip. It takes about 1-2 minutes a side.


Yummmmmmmmy...

I usually just use Orange Marmalade but for the blog I decided we step it up a notch and added rice wine vinegar and chili pepper flakes. So gooooooood!


I paired mine with grits and asparagus with goat cheese and the husband was a happy boy. Well, minus the asparagus. Asparagus makes him angry for some reason.


Val's Version 
(Denver, CO)

Yummy, yummy in my tummy! This one will definitely be a repeat contestant in our hizzy :)

We happen to love seafood in our family. I blame it on my Dad. When we were growing up, trips to the beach included quite a few seafood dining experiences ... with ALL 4 kids. My Mom also likes to just boil up a pot of crab legs with corn and new potatoes for family dinner. 
Who's complaining? Not this girl. 

So, my pallet was introduced at an early age to the finer foods in life. My husband, well … he eats just about anything. And Cali isn't picky (unless she sees me being picky). Therefore, we eat good.

Jen's cooked this a time or two and this was my first go at it. Coconut crusted chicken I've done. Not the shrimpies. I saw somewhere how easy it is to overcook shrimp, so I've really only topped it on pasta and done it scampi style. Or the infamous cocktail shrimp. My other half is the grill master and he can do some crazy good marinades. This lady was ready to try something new!

Ok - so I was uploading my pictures and came across this and just couldn't resist. 
He also LOVES to eat ...

(Lucas 2013 - 1 year old)

I only used the specified amount of spices this go around and will be adding more next time. I love to taste the different flavors and felt like this could've had a bit more. I even did a couple extra dashes of Paprika, but it needed something more. 


Once you've got your stations set up (I always have stations), you're ready to take the shrimp through it's journey into the frying pan. Quite the process.


Dip the shrimp into the flour blend, then dunk them into the egg, and then right on over to the coconut mixture. Place them on your rack/baking sheet so the unattached coating can fall 
and not stick to the pan.


BOOM! Into the boiling oil they go. See-ya suckas :O) 
BE CAREFUL! This step is a little dangerous and if you have young ankle biters, keep them at bay. There needs to be some kind of safety equipment for frying. Probably is, I just haven't been smart enough to invest in any yet.


They need to cook for no more than 2 minutes on each side. Once they start really curling, they are done and could be overdone. The perfect shrimp makes an open "C" not an "O." Don't compare mine to that trick. 


While my shrimp were frying, I worked on the marmalade. Cali LOVED saying that, by the way.  Add the orange marmalade, rice vinegar and red pepper flakes to a pot and let that simmer for about 8-10 minutes, or until hot and melted. We really enjoyed this dipping sauce and will most likely use it again with other foods. 


And presto! Fit for a King ...


Oops - here's the finished product!


THANKS Tracy for sharing your culinary adventures :)